/filters:quality(75)/mediadev/media/menu-pics/menu_banner_mobile.png)
/filters:quality(75)/mediadev/media/menu-pics/all-porcelain.jpg)
/filters:quality(75)/mediadev/media/menu-pics/luxury-italian.jpg)
/filters:quality(75)/mediadev/media/menu-pics/premium-italian.jpg)
/filters:quality(75)/mediadev/media/menu-pics/budget-porcelain.jpg)
/filters:quality(75)/mediadev/media/menu-pics/large-format-porcelain.jpg)
/filters:quality(75)/mediadev/media/menu-pics/wood-effect-porcelain.jpg)
/filters:quality(75)/mediadev/media/menu-pics/porcelain-planks.jpg)
/filters:quality(75)/mediadev/media/menu-pics/porcelain-setts.jpg)
/filters:quality(75)/mediadev/media/menu-pics/browse-all-paving.jpg)
/filters:quality(75)/mediadev/media/menu-pics/driveway-paving.jpg)
/filters:quality(75)/mediadev/media/menu-pics/interior-tiles.jpg)
/filters:quality(75)/mediadev/media/menu-pics/stone-effect-porcelain.png)
/filters:quality(75)/mediadev/media/menu-pics/wood-effect-porcelain.png)
/filters:quality(75)/mediadev/media/menu-pics/grey-porcelain.png)
/filters:quality(75)/mediadev/media/menu-pics/beige-porcelain.png)
/filters:quality(75)/mediadev/media/menu-pics/dark-porcelain.png)
/filters:quality(75)/mediadev/media/menu-pics/light-porcelain.png)
/filters:quality(75)/mediadev/media/menu-pics/patio-grout.jpg)
/filters:quality(75)/mediadev/media/menu-pics/primers.jpg)
/filters:quality(75)/mediadev/media/menu-pics/porcelain-blades.jpg)
/filters:quality(75)/mediadev/media/menu-pics/pedestals.jpg)
/filters:quality(90)/mediadev/media/menu-pics/drainage.jpg)
/filters:quality(90)/mediadev/media/menu-pics/cleaners.jpg)
/filters:quality(75)/mediadev/media/menu-pics/all-stone-paving.jpg)
/filters:quality(75)/mediadev/media/menu-pics/all-sawn-paving.jpg)
/filters:quality(75)/mediadev/media/menu-pics/all-riven-paving.jpg)
/filters:quality(75)/mediadev/media/menu-pics/indian-sandstone.jpg)
/filters:quality(75)/mediadev/media/menu-pics/limestone-paving.jpg)
/filters:quality(75)/mediadev/media/menu-pics/granite-paving.jpg)
/filters:quality(75)/mediadev/media/menu-pics/slate-paving.jpg)
/filters:quality(75)/mediadev/media/menu-pics/yorkstone-paving.jpg)
/filters:quality(75)/mediadev/media/menu-pics/portland.jpg)
/filters:quality(75)/mediadev/media/menu-pics/stone-pavers.jpg)
/filters:quality(75)/mediadev/media/menu-pics/cobbles-setts.jpg)
/filters:quality(75)/mediadev/media/menu-pics/plank-paving.jpg)
/filters:quality(75)/mediadev/media/menu-pics/paving-circles.jpg)
/filters:quality(75)/mediadev/media/menu-pics/bespoke-paving-1.jpg)
/filters:quality(75)/mediadev/media/menu-pics/edging-stones-1.jpg)
/filters:quality(75)/mediadev/media/menu-pics/prestige-stone.jpg)
/filters:quality(75)/mediadev/media/menu-pics/grey-blue-stone.png)
/filters:quality(75)/mediadev/media/menu-pics/swatch-black-dark.jpg)
/filters:quality(75)/mediadev/media/menu-pics/swatch-buff-beige-white.jpg)
/filters:quality(90)/mediadev/media/menu-pics/sealants.jpg)
/filters:quality(75)/mediadev/media/menu-pics/all-clay-paving.jpg)
/filters:quality(75)/mediadev/media/menu-pics/alpha-clay-pavers.jpg)
/filters:quality(75)/mediadev/media/menu-pics/cottage-garden-clay-pavers.jpg)
/filters:quality(75)/mediadev/media/menu-pics/kessel-garden-clay-pavers.jpg)
/filters:quality(75)/mediadev/media/menu-pics/artisan-clay-pavers.jpg)
/filters:quality(75)/mediadev/media/menu-pics/grey-blue-clay-paver.png)
/filters:quality(75)/mediadev/media/menu-pics/red-brown-clay-pavers.png)
/filters:quality(75)/mediadev/media/menu-pics/beige-buff-clay-pavers.png)
/filters:quality(75)/mediadev/media/menu-pics/composite-decking.jpg)
/filters:quality(75)/mediadev/media/menu-pics/designboard-decking.jpg)
/filters:quality(75)/mediadev/media/menu-pics/classic-designboard.jpg)
/filters:quality(75)/mediadev/media/menu-pics/brushed-designboard.jpg)
/filters:quality(75)/mediadev/media/menu-pics/grooved-designboard.jpg)
/filters:quality(75)/mediadev/media/menu-pics/millboard-decking.jpg)
/filters:quality(75)/mediadev/media/menu-pics/grey-decking.jpg)
/filters:quality(75)/mediadev/media/menu-pics/black-charcoal-decking.jpg)
/filters:quality(75)/mediadev/media/menu-pics/brown-decking.jpg)
/filters:quality(75)/mediadev/media/menu-pics/all-build-deck.png)
/filters:quality(75)/mediadev/media/menu-pics/all-vertical.jpg)
/filters:quality(75)/mediadev/media/menu-pics/luxury-designclad.jpg)
/filters:quality(75)/mediadev/media/menu-pics/stone-cladding.jpg)
/filters:quality(75)/mediadev/media/menu-pics/all-garden-walling-1.jpg)
/filters:quality(75)/mediadev/media/menu-pics/facing-bricks.jpg)
/filters:quality(75)/mediadev/media/menu-pics/garden-screening.jpg)
/filters:quality(75)/mediadev/media/menu-pics/menu_Garden_banner_desk.png)
/filters:quality(75)/mediadev/media/menu-pics/all-steps-coping.jpg)
/filters:quality(75)/mediadev/media/menu-pics/stone-garden-steps.jpg)
/filters:quality(75)/mediadev/media/menu-pics/sawn-steps.jpg)
/filters:quality(75)/mediadev/media/menu-pics/riven-steps.jpg)
/filters:quality(75)/mediadev/media/menu-pics/yorkstone-steps.jpg)
/filters:quality(75)/mediadev/media/menu-pics/bespoke-steps.jpg)
/filters:quality(75)/mediadev/media/menu-pics/porcelain-steps.jpg)
/filters:quality(75)/mediadev/media/menu-pics/off-the-shelf.jpg)
/filters:quality(75)/mediadev/media/menu-pics/stone-coping.jpg)
/filters:quality(75)/mediadev/media/menu-pics/sawn-coping.jpg)
/filters:quality(75)/mediadev/media/menu-pics/riven-coping.jpg)
/filters:quality(75)/mediadev/media/menu-pics/yorkstone-coping.jpg)
/filters:quality(75)/mediadev/media/menu-pics/bespoke-coping.jpg)
/filters:quality(75)/mediadev/media/menu-pics/stone-pier-caps.jpg)
/filters:quality(75)/mediadev/media/menu-pics/porcelain-coping.jpg)
/filters:quality(75)/mediadev/media/menu-pics/all-bespoke-services.jpg)
/filters:quality(75)/mediadev/media/menu-pics/bespoke-paving-2.jpg)
/filters:quality(75)/mediadev/media/menu-pics/bespoke-steps-1.jpg)
/filters:quality(75)/mediadev/media/menu-pics/bespoke-coping-1.jpg)
/filters:quality(75)/mediadev/media/menu-pics/edge-profiles.jpg)
/filters:quality(75)/mediadev/media/menu-pics/masonry-services.jpg)
/filters:quality(75)/mediadev/media/menu-pics/deluxe-pergolas.jpg)
/filters:quality(75)/mediadev/media/menu-pics/proteus-pergolas.jpg)
/filters:quality(75)/mediadev/media/menu-pics/corten_planter_menu.png)
 Trade Discount Available
 FREE Nationwide Delivery
 Nationwide Showrooms
 Live Stock Levels
 Split Packs Available
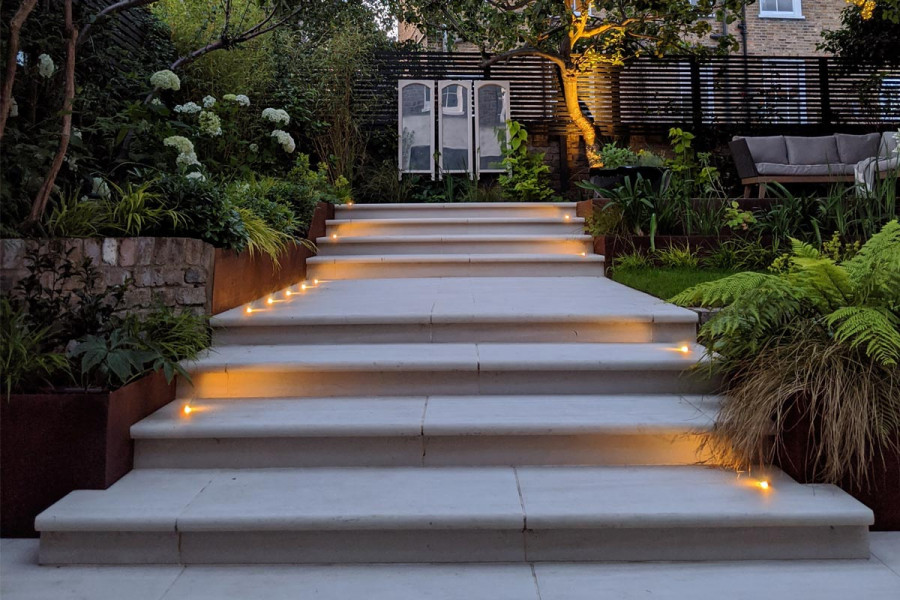
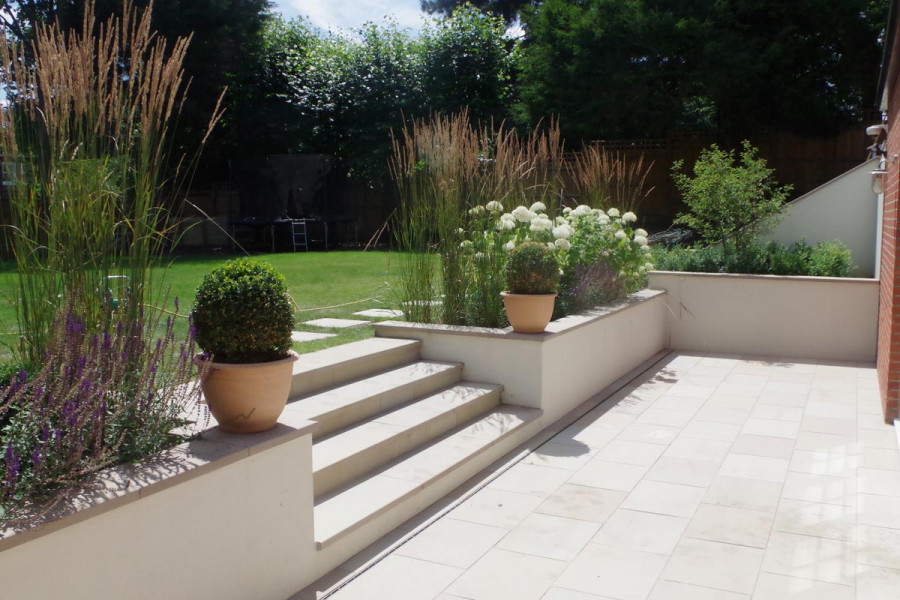
Building steps can feel daunting. But they add so much to a garden design, whether you are looking to add visual interest to the garden or working with changes in the ground level. Gain confidence with our easy guide on how to build steps and helpful video.
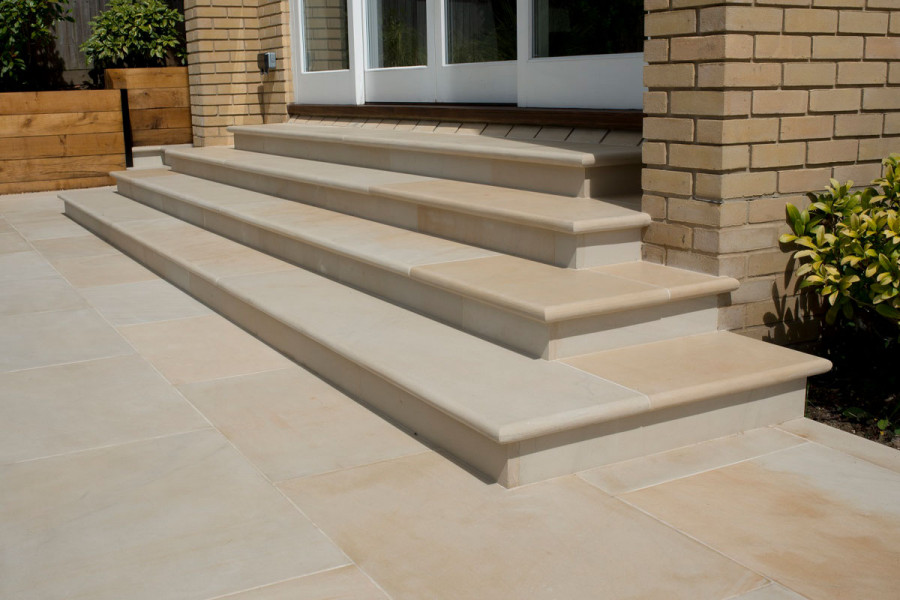
Step Construction
Good preparation is key! Step bases should be constructed of concrete blocks on strong concrete foundations. Step bases should also be flat and free of any protruding mortar. Any cavities should be filled with concrete or compacted DTp (MOT) Type 1.
Step Installation - How To Build Steps
- Spread a layer of mortar across the base where the first step tread is to be fixed, to create the bed. The mortar bed should be approximately 20-25mm thick. Continue to spread and smooth the full bedding layer to ensure full contact.
- Apply primer to the back of the step tread. Take care during this step not to apply the primer to the edges or the overhang of the step, where there is one, as this may be visible. The primer will ensure a secure fix that will stay in place and won’t be affected by frost.
- Lay the first step tread. Place the tread on the mortar bed and tap gently into place using a rubber mallet. The step should be level from left to right; use a spirit level to check that it is straight. A small fall should be incorporated from back to front to aid water run-off.
- Install the riser directly on top of the step tread. The riser should sit directly on top of the step tread with no gap between the top of the step tread and the bottom of the riser. Apply mortar to the surface to which the riser will be fixed and apply the primer to the back of the riser. Firmly press the riser against the step base. Check the riser is vertically level and square to the step tread that it sits upon. Once the riser is laid, remember to measure back to ensure there is equal depth to each tread.
- Use the same method to continue to install the remaining step treads and risers. Continually check levels and measurements as you go.
General Notes and Tips
- Keep the step below the one you're laying covered and be sure to have a bucket and sponge to hand to clean mortar spills immediately before proceeding to the next step.
- Remembering to clean up mess as you are going along will avoid damaging the step with mortar stains.
- If it is a wide step that needs more than one tread, we recommend using 5mm spacers between them to create even jointing.
- If possible, try to design the step base to dimensions that minimise the number of cuts to be made to the treads.
- Remember to fill any cavities before installing the next step tread or riser.
Regulations
You should make yourself aware of current building regulations and ensure all steps conform as required. This applies, for example, where steps are part of a fire escape route.
Design inspiration
Plenty of thought has to go into step design and we provide a list of what you need to think about when designing steps. But thinking up the design is one of the best bits. Gain inspiration from our garden step ideas.
Post updated: March 2025