/filters:quality(75)/mediadev/media/menu-pics/menu_banner_mobile.png)
/filters:quality(75)/mediadev/media/menu-pics/all-porcelain.jpg)
/filters:quality(75)/mediadev/media/menu-pics/luxury-italian.jpg)
/filters:quality(75)/mediadev/media/menu-pics/premium-italian.jpg)
/filters:quality(75)/mediadev/media/menu-pics/budget-porcelain.jpg)
/filters:quality(75)/mediadev/media/menu-pics/large-format-porcelain.jpg)
/filters:quality(75)/mediadev/media/menu-pics/wood-effect-porcelain.jpg)
/filters:quality(75)/mediadev/media/menu-pics/porcelain-planks.jpg)
/filters:quality(75)/mediadev/media/menu-pics/porcelain-setts.jpg)
/filters:quality(75)/mediadev/media/menu-pics/browse-all-paving.jpg)
/filters:quality(75)/mediadev/media/menu-pics/driveway-paving.jpg)
/filters:quality(75)/mediadev/media/menu-pics/interior-tiles.jpg)
/filters:quality(75)/mediadev/media/menu-pics/stone-effect-porcelain.png)
/filters:quality(75)/mediadev/media/menu-pics/wood-effect-porcelain.png)
/filters:quality(75)/mediadev/media/menu-pics/grey-porcelain.png)
/filters:quality(75)/mediadev/media/menu-pics/beige-porcelain.png)
/filters:quality(75)/mediadev/media/menu-pics/dark-porcelain.png)
/filters:quality(75)/mediadev/media/menu-pics/light-porcelain.png)
/filters:quality(75)/mediadev/media/menu-pics/patio-grout.jpg)
/filters:quality(75)/mediadev/media/menu-pics/primers.jpg)
/filters:quality(75)/mediadev/media/menu-pics/porcelain-blades.jpg)
/filters:quality(75)/mediadev/media/menu-pics/pedestals.jpg)
/filters:quality(90)/mediadev/media/menu-pics/drainage.jpg)
/filters:quality(90)/mediadev/media/menu-pics/cleaners.jpg)
/filters:quality(75)/mediadev/media/menu-pics/all-stone-paving.jpg)
/filters:quality(75)/mediadev/media/menu-pics/all-sawn-paving.jpg)
/filters:quality(75)/mediadev/media/menu-pics/all-riven-paving.jpg)
/filters:quality(75)/mediadev/media/menu-pics/indian-sandstone.jpg)
/filters:quality(75)/mediadev/media/menu-pics/limestone-paving.jpg)
/filters:quality(75)/mediadev/media/menu-pics/granite-paving.jpg)
/filters:quality(75)/mediadev/media/menu-pics/slate-paving.jpg)
/filters:quality(75)/mediadev/media/menu-pics/yorkstone-paving.jpg)
/filters:quality(75)/mediadev/media/menu-pics/portland.jpg)
/filters:quality(75)/mediadev/media/menu-pics/stone-pavers.jpg)
/filters:quality(75)/mediadev/media/menu-pics/cobbles-setts.jpg)
/filters:quality(75)/mediadev/media/menu-pics/plank-paving.jpg)
/filters:quality(75)/mediadev/media/menu-pics/paving-circles.jpg)
/filters:quality(75)/mediadev/media/menu-pics/bespoke-paving-1.jpg)
/filters:quality(75)/mediadev/media/menu-pics/edging-stones-1.jpg)
/filters:quality(75)/mediadev/media/menu-pics/prestige-stone.jpg)
/filters:quality(75)/mediadev/media/menu-pics/grey-blue-stone.png)
/filters:quality(75)/mediadev/media/menu-pics/swatch-black-dark.jpg)
/filters:quality(75)/mediadev/media/menu-pics/swatch-buff-beige-white.jpg)
/filters:quality(90)/mediadev/media/menu-pics/sealants.jpg)
/filters:quality(75)/mediadev/media/menu-pics/all-clay-paving.jpg)
/filters:quality(75)/mediadev/media/menu-pics/alpha-clay-pavers.jpg)
/filters:quality(75)/mediadev/media/menu-pics/cottage-garden-clay-pavers.jpg)
/filters:quality(75)/mediadev/media/menu-pics/kessel-garden-clay-pavers.jpg)
/filters:quality(75)/mediadev/media/menu-pics/artisan-clay-pavers.jpg)
/filters:quality(75)/mediadev/media/menu-pics/grey-blue-clay-paver.png)
/filters:quality(75)/mediadev/media/menu-pics/red-brown-clay-pavers.png)
/filters:quality(75)/mediadev/media/menu-pics/beige-buff-clay-pavers.png)
/filters:quality(75)/mediadev/media/menu-pics/composite-decking.jpg)
/filters:quality(75)/mediadev/media/menu-pics/designboard-decking.jpg)
/filters:quality(75)/mediadev/media/menu-pics/classic-designboard.jpg)
/filters:quality(75)/mediadev/media/menu-pics/brushed-designboard.jpg)
/filters:quality(75)/mediadev/media/menu-pics/grooved-designboard.jpg)
/filters:quality(75)/mediadev/media/menu-pics/millboard-decking.jpg)
/filters:quality(75)/mediadev/media/menu-pics/grey-decking.jpg)
/filters:quality(75)/mediadev/media/menu-pics/black-charcoal-decking.jpg)
/filters:quality(75)/mediadev/media/menu-pics/brown-decking.jpg)
/filters:quality(75)/mediadev/media/menu-pics/all-build-deck.png)
/filters:quality(75)/mediadev/media/menu-pics/all-vertical.jpg)
/filters:quality(75)/mediadev/media/menu-pics/luxury-designclad.jpg)
/filters:quality(75)/mediadev/media/menu-pics/stone-cladding.jpg)
/filters:quality(75)/mediadev/media/menu-pics/all-garden-walling-1.jpg)
/filters:quality(75)/mediadev/media/menu-pics/facing-bricks.jpg)
/filters:quality(75)/mediadev/media/menu-pics/garden-screening.jpg)
/filters:quality(75)/mediadev/media/menu-pics/menu_Garden_banner_desk.png)
/filters:quality(75)/mediadev/media/menu-pics/all-steps-coping.jpg)
/filters:quality(75)/mediadev/media/menu-pics/stone-garden-steps.jpg)
/filters:quality(75)/mediadev/media/menu-pics/sawn-steps.jpg)
/filters:quality(75)/mediadev/media/menu-pics/riven-steps.jpg)
/filters:quality(75)/mediadev/media/menu-pics/yorkstone-steps.jpg)
/filters:quality(75)/mediadev/media/menu-pics/bespoke-steps.jpg)
/filters:quality(75)/mediadev/media/menu-pics/porcelain-steps.jpg)
/filters:quality(75)/mediadev/media/menu-pics/off-the-shelf.jpg)
/filters:quality(75)/mediadev/media/menu-pics/stone-coping.jpg)
/filters:quality(75)/mediadev/media/menu-pics/sawn-coping.jpg)
/filters:quality(75)/mediadev/media/menu-pics/riven-coping.jpg)
/filters:quality(75)/mediadev/media/menu-pics/yorkstone-coping.jpg)
/filters:quality(75)/mediadev/media/menu-pics/bespoke-coping.jpg)
/filters:quality(75)/mediadev/media/menu-pics/stone-pier-caps.jpg)
/filters:quality(75)/mediadev/media/menu-pics/porcelain-coping.jpg)
/filters:quality(75)/mediadev/media/menu-pics/all-bespoke-services.jpg)
/filters:quality(75)/mediadev/media/menu-pics/bespoke-paving-2.jpg)
/filters:quality(75)/mediadev/media/menu-pics/bespoke-steps-1.jpg)
/filters:quality(75)/mediadev/media/menu-pics/bespoke-coping-1.jpg)
/filters:quality(75)/mediadev/media/menu-pics/edge-profiles.jpg)
/filters:quality(75)/mediadev/media/menu-pics/masonry-services.jpg)
/filters:quality(75)/mediadev/media/menu-pics/deluxe-pergolas.jpg)
/filters:quality(75)/mediadev/media/menu-pics/proteus-pergolas.jpg)
/filters:quality(75)/mediadev/media/menu-pics/corten_planter_menu.png)
 Trade Discount Available
 FREE Nationwide Delivery
 Nationwide Showrooms
 Live Stock Levels
 Split Packs Available
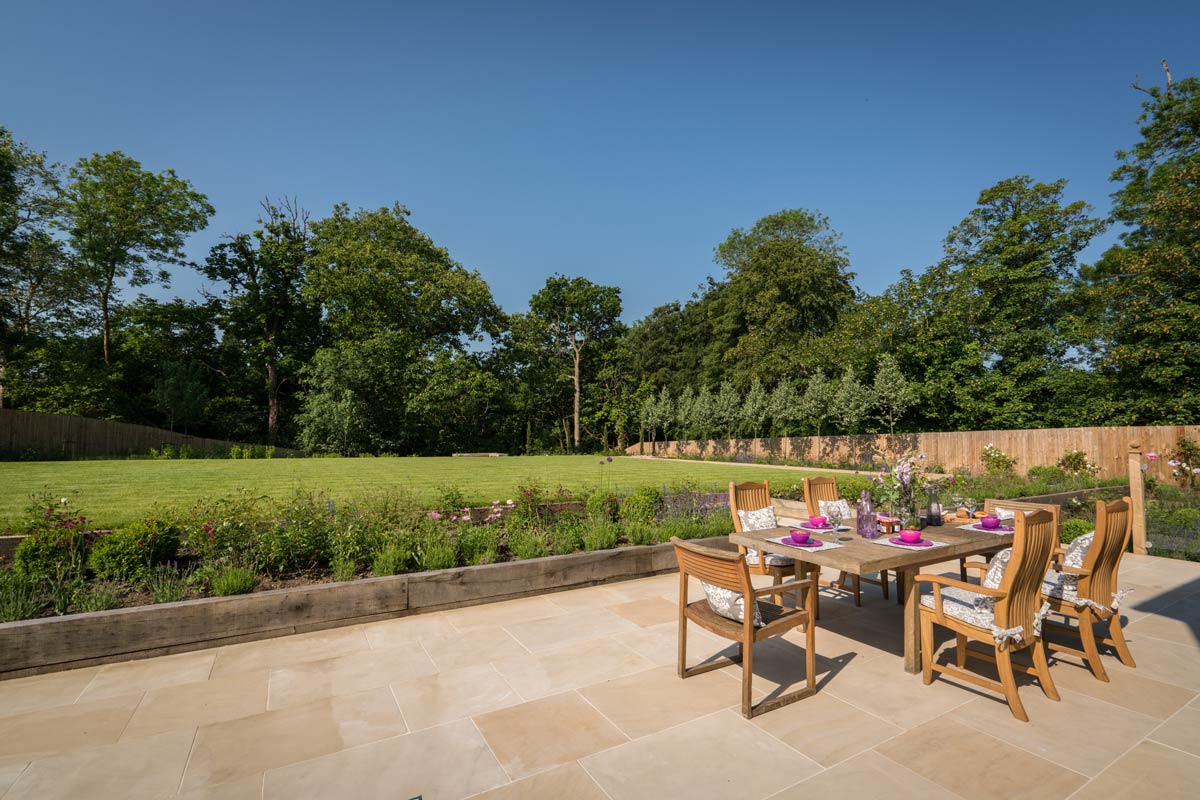
Once you've laid your paving, bad weather makes sealing it almost impossible. That's why you need to plan ahead. We give you the low-down on how to seal paving slabs.
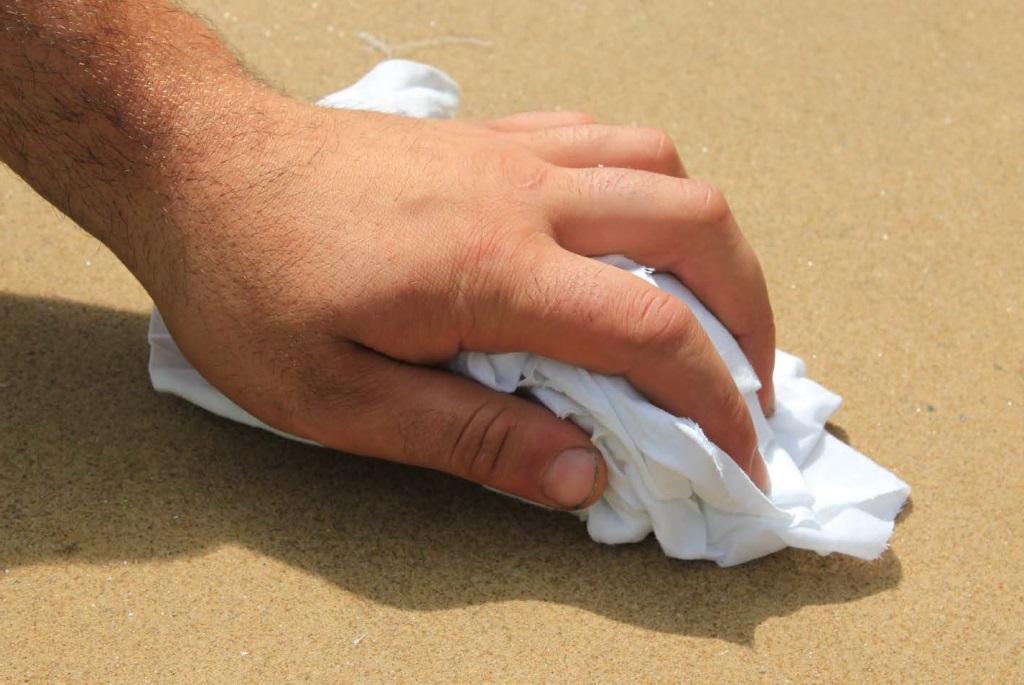
Ensure paving is completely dry before sealing
Stone that's to be sealed needs to be bone-dry; no ‘ifs’, no ‘buts’, no saying “That's probably dry enough”. If it isn't totally dry, moisture in the stone will interfere with the sealing solution and compromise the results. The problem is that guaranteeing a dry spell at any time of year can be difficult.
- Find a way to keep stone under cover from the moment you receive it, to ensure it stays dry.
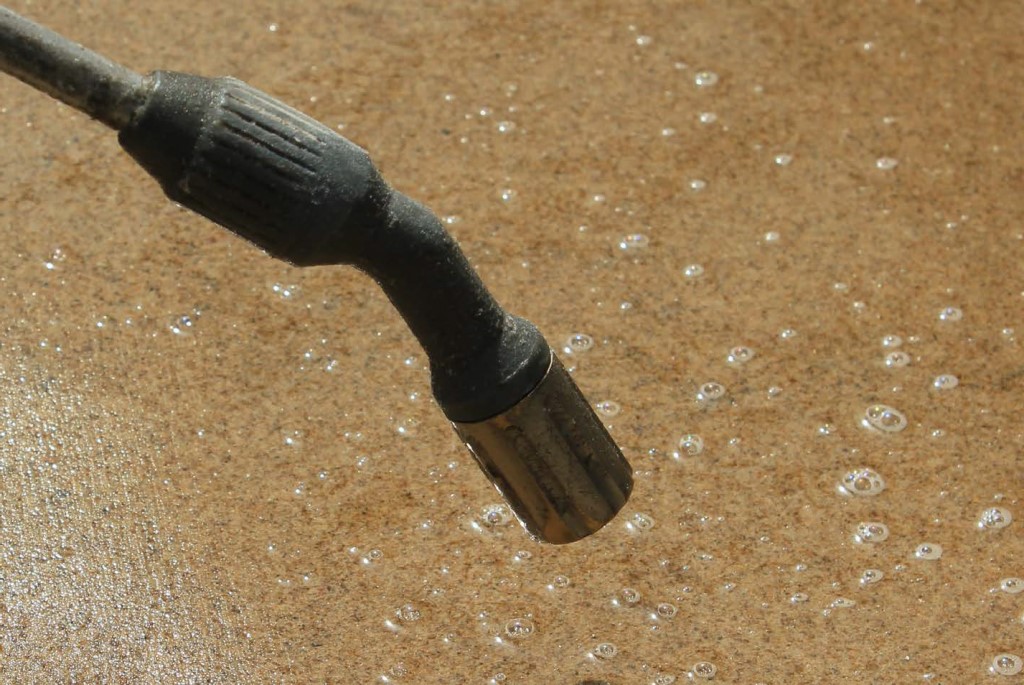
- Use a brush and light jet wash to remove all surface debris and dirt. There's no need to use a cleaning solution; that is only necessary if stone is being sealed some months down the line, after it has been laid.
- Make sure the stone dries thoroughly after contact with water. At any time of year, we recommend leaving it for at least twenty-four hours. However, when it's cold and the atmosphere is damp, it will probably take longer. It's worth remembering that even if it looks dry on the surface, you want to ensure any moisture deeper within the stone has the chance to evaporate.
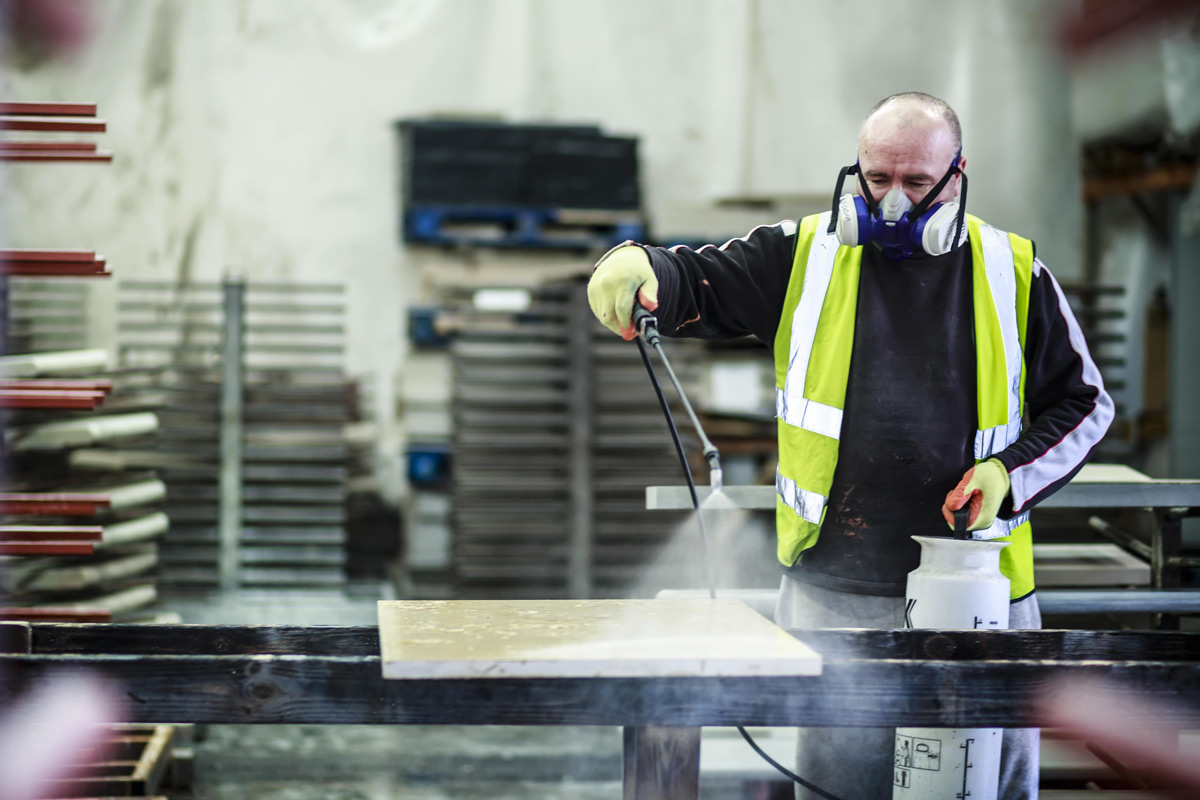
Applying the sealant
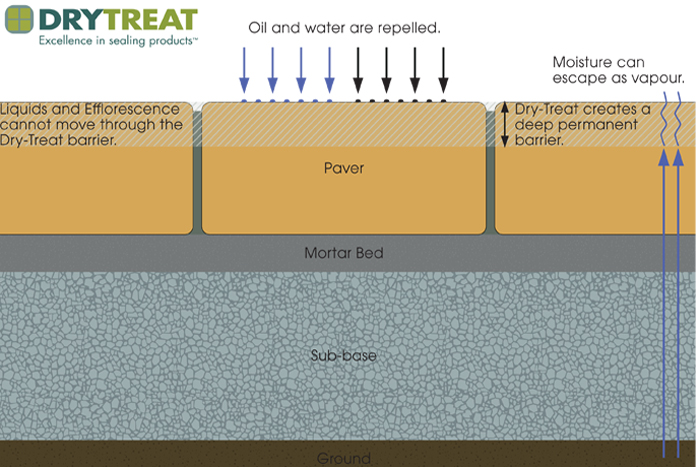
- Sealing requires two coats, applied evenly across the surface of the slab with a sprayer. The second coat should be applied soon after the first, at a 90º angle to the first to ensure complete coverage. We highly recommend using Dry Treat Stain Proof, which we've found, in our tests, to penetrate deeper than other sealants, impregnating stone as much as 6mm while still allowing it to breathe. If you're laying dark stone such as Midnight Black Limestone, you might prefer Dry Treat Intensifia to enhance the rich colour. Find the right sealant for you.
- Sealant should not be applied to the back or sides of the slabs (a small amount will cover the edges whilst applying; this is nothing to worry about) as it can compromise adhesion to the bedding and surrounding grouting.
- Slabs should not get wet while the sealant is drying. They should be left for a minimum of six to eight hours (possibly more during colder or damper weather). Otherwise, the sealant might fail. Once this is done, the stone is ready for laying.
Although sealing is something that has only become more prominent within the last decade or so, it is strongly recommended now that natural stone, and particularly sawn stone, is so highly prized. It makes aftercare much easier, inhibiting stains, and helping maintain the clean look of just-installed stone, as well as preventing unsightly efflorescence and picture framing.
This has been a quick run-down of elements of sealing that are sometimes overlooked. For more, see our complete step-by-step guide to sealing.
Factory-sealed paving service
Knowing how to seal paving slabs properly is the key to getting a professional-looking finish. You can see why we stress that sealing is carried out under cover. Not an easy ask for many projects.
This is one of the reasons we offer factory sealing, to provide natural stone and porcelain that is already treated and ready to use. This saves you the headache of storing slabs under cover, dealing with the weather, maybe having to shift timetables and being sure you've done it right.
Find out more about our sealing service. Or why not visit one of our showrooms around the M25? There you'll also get to see how our sealed stone has stood up to the heavy footfall in our paving display areas.
Post updated: June 2023