/filters:quality(75)/mediadev/media/menu-pics/menu_banner_mobile.png)
/filters:quality(75)/mediadev/media/menu-pics/all-porcelain.jpg)
/filters:quality(75)/mediadev/media/menu-pics/luxury-italian.jpg)
/filters:quality(75)/mediadev/media/menu-pics/premium-italian.jpg)
/filters:quality(75)/mediadev/media/menu-pics/budget-porcelain.jpg)
/filters:quality(75)/mediadev/media/menu-pics/large-format-porcelain.jpg)
/filters:quality(75)/mediadev/media/menu-pics/wood-effect-porcelain.jpg)
/filters:quality(75)/mediadev/media/menu-pics/porcelain-planks.jpg)
/filters:quality(75)/mediadev/media/menu-pics/porcelain-setts.jpg)
/filters:quality(75)/mediadev/media/menu-pics/browse-all-paving.jpg)
/filters:quality(75)/mediadev/media/menu-pics/driveway-paving.jpg)
/filters:quality(75)/mediadev/media/menu-pics/interior-tiles.jpg)
/filters:quality(75)/mediadev/media/menu-pics/stone-effect-porcelain.png)
/filters:quality(75)/mediadev/media/menu-pics/wood-effect-porcelain.png)
/filters:quality(75)/mediadev/media/menu-pics/grey-porcelain.png)
/filters:quality(75)/mediadev/media/menu-pics/beige-porcelain.png)
/filters:quality(75)/mediadev/media/menu-pics/dark-porcelain.png)
/filters:quality(75)/mediadev/media/menu-pics/light-porcelain.png)
/filters:quality(75)/mediadev/media/menu-pics/patio-grout.jpg)
/filters:quality(75)/mediadev/media/menu-pics/primers.jpg)
/filters:quality(75)/mediadev/media/menu-pics/porcelain-blades.jpg)
/filters:quality(75)/mediadev/media/menu-pics/pedestals.jpg)
/filters:quality(90)/mediadev/media/menu-pics/drainage.jpg)
/filters:quality(90)/mediadev/media/menu-pics/cleaners.jpg)
/filters:quality(75)/mediadev/media/menu-pics/all-stone-paving.jpg)
/filters:quality(75)/mediadev/media/menu-pics/all-sawn-paving.jpg)
/filters:quality(75)/mediadev/media/menu-pics/all-riven-paving.jpg)
/filters:quality(75)/mediadev/media/menu-pics/indian-sandstone.jpg)
/filters:quality(75)/mediadev/media/menu-pics/limestone-paving.jpg)
/filters:quality(75)/mediadev/media/menu-pics/granite-paving.jpg)
/filters:quality(75)/mediadev/media/menu-pics/slate-paving.jpg)
/filters:quality(75)/mediadev/media/menu-pics/yorkstone-paving.jpg)
/filters:quality(75)/mediadev/media/menu-pics/portland.jpg)
/filters:quality(75)/mediadev/media/menu-pics/stone-pavers.jpg)
/filters:quality(75)/mediadev/media/menu-pics/cobbles-setts.jpg)
/filters:quality(75)/mediadev/media/menu-pics/plank-paving.jpg)
/filters:quality(75)/mediadev/media/menu-pics/paving-circles.jpg)
/filters:quality(75)/mediadev/media/menu-pics/bespoke-paving-1.jpg)
/filters:quality(75)/mediadev/media/menu-pics/edging-stones-1.jpg)
/filters:quality(75)/mediadev/media/menu-pics/prestige-stone.jpg)
/filters:quality(75)/mediadev/media/menu-pics/grey-blue-stone.png)
/filters:quality(75)/mediadev/media/menu-pics/swatch-black-dark.jpg)
/filters:quality(75)/mediadev/media/menu-pics/swatch-buff-beige-white.jpg)
/filters:quality(90)/mediadev/media/menu-pics/sealants.jpg)
/filters:quality(75)/mediadev/media/menu-pics/all-clay-paving.jpg)
/filters:quality(75)/mediadev/media/menu-pics/alpha-clay-pavers.jpg)
/filters:quality(75)/mediadev/media/menu-pics/cottage-garden-clay-pavers.jpg)
/filters:quality(75)/mediadev/media/menu-pics/kessel-garden-clay-pavers.jpg)
/filters:quality(75)/mediadev/media/menu-pics/artisan-clay-pavers.jpg)
/filters:quality(75)/mediadev/media/menu-pics/grey-blue-clay-paver.png)
/filters:quality(75)/mediadev/media/menu-pics/red-brown-clay-pavers.png)
/filters:quality(75)/mediadev/media/menu-pics/beige-buff-clay-pavers.png)
/filters:quality(75)/mediadev/media/menu-pics/composite-decking.jpg)
/filters:quality(75)/mediadev/media/menu-pics/designboard-decking.jpg)
/filters:quality(75)/mediadev/media/menu-pics/classic-designboard.jpg)
/filters:quality(75)/mediadev/media/menu-pics/brushed-designboard.jpg)
/filters:quality(75)/mediadev/media/menu-pics/grooved-designboard.jpg)
/filters:quality(75)/mediadev/media/menu-pics/millboard-decking.jpg)
/filters:quality(75)/mediadev/media/menu-pics/grey-decking.jpg)
/filters:quality(75)/mediadev/media/menu-pics/black-charcoal-decking.jpg)
/filters:quality(75)/mediadev/media/menu-pics/brown-decking.jpg)
/filters:quality(75)/mediadev/media/menu-pics/all-build-deck.png)
/filters:quality(75)/mediadev/media/menu-pics/all-vertical.jpg)
/filters:quality(75)/mediadev/media/menu-pics/luxury-designclad.jpg)
/filters:quality(75)/mediadev/media/menu-pics/stone-cladding.jpg)
/filters:quality(75)/mediadev/media/menu-pics/all-garden-walling-1.jpg)
/filters:quality(75)/mediadev/media/menu-pics/facing-bricks.jpg)
/filters:quality(75)/mediadev/media/menu-pics/garden-screening.jpg)
/filters:quality(75)/mediadev/media/menu-pics/menu_Garden_banner_desk.png)
/filters:quality(75)/mediadev/media/menu-pics/all-steps-coping.jpg)
/filters:quality(75)/mediadev/media/menu-pics/stone-garden-steps.jpg)
/filters:quality(75)/mediadev/media/menu-pics/sawn-steps.jpg)
/filters:quality(75)/mediadev/media/menu-pics/riven-steps.jpg)
/filters:quality(75)/mediadev/media/menu-pics/yorkstone-steps.jpg)
/filters:quality(75)/mediadev/media/menu-pics/bespoke-steps.jpg)
/filters:quality(75)/mediadev/media/menu-pics/porcelain-steps.jpg)
/filters:quality(75)/mediadev/media/menu-pics/off-the-shelf.jpg)
/filters:quality(75)/mediadev/media/menu-pics/stone-coping.jpg)
/filters:quality(75)/mediadev/media/menu-pics/sawn-coping.jpg)
/filters:quality(75)/mediadev/media/menu-pics/riven-coping.jpg)
/filters:quality(75)/mediadev/media/menu-pics/yorkstone-coping.jpg)
/filters:quality(75)/mediadev/media/menu-pics/bespoke-coping.jpg)
/filters:quality(75)/mediadev/media/menu-pics/stone-pier-caps.jpg)
/filters:quality(75)/mediadev/media/menu-pics/porcelain-coping.jpg)
/filters:quality(75)/mediadev/media/menu-pics/all-bespoke-services.jpg)
/filters:quality(75)/mediadev/media/menu-pics/bespoke-paving-2.jpg)
/filters:quality(75)/mediadev/media/menu-pics/bespoke-steps-1.jpg)
/filters:quality(75)/mediadev/media/menu-pics/bespoke-coping-1.jpg)
/filters:quality(75)/mediadev/media/menu-pics/edge-profiles.jpg)
/filters:quality(75)/mediadev/media/menu-pics/masonry-services.jpg)
/filters:quality(75)/mediadev/media/menu-pics/deluxe-pergolas.jpg)
/filters:quality(75)/mediadev/media/menu-pics/proteus-pergolas.jpg)
/filters:quality(75)/mediadev/media/menu-pics/corten_planter_menu.png)
 Trade Discount Available
 FREE Nationwide Delivery
 Nationwide Showrooms
 Live Stock Levels
 Split Packs Available
We’re often asked what you should know about laying Indian sandstone paving. Here we give you the hows and whys that you don’t always find elsewhere.
Before you start
When you receive the slabs, the first thing to do is sort through them. There may some slabs that are too riven or where the colour varies too much for your liking.
This is not a fault. Stone is a natural product, so there will always be variation in colour and texture. The best way to get round this is by ordering an extra 10% for wastage and spend half an hour looking through the flags. That way you can set aside the odd-looking slabs for cuts, or to be used in discreet areas.
Using the correct mortar mix
For a demo on laying Indian sandstone for a professional finish, covering all stages from the MOT sub base to pointing, please watch our instructional video. We also recommend reading our paving installation guide.
Sandstone paving should be laid on a mortar mix of 5 parts sharp sand to 1 part cement in a semi-dry mix. This is different from the mix of 10:1 that is familiar to anyone who has, in the past, laid cast concrete flags. These were always the same 50mm thickness and this sandier dry mix works well.
Indian sandstone slabs vary in thickness by +/- 5mm. This means that the difference between slabs can be as much as 10mm. This difference, described as “tolerance”, is an accepted element of natural stone paving.
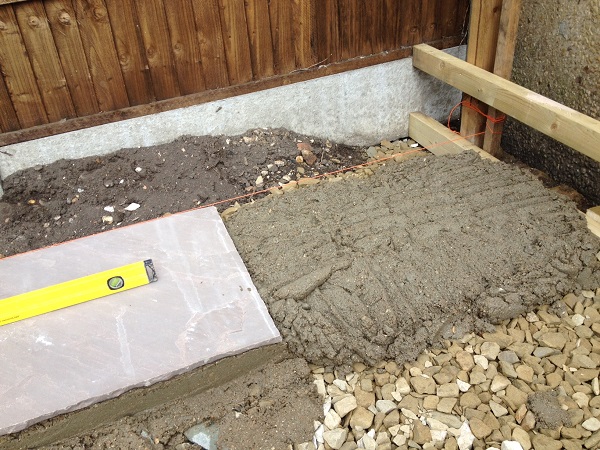
The 5:1 semi-dry mix is wetter and allows the finished height of individual paving slabs to be adjusted to counter this variation in thickness. Levels can be adjusted by tapping the slab into place with a rubber mallet.
The moisture level of the mix is important. It’s about right when the mix holds together when squeezed in your hand, but doesn’t ooze water.
If the mix is too wet, then slabs can sometimes sink under their own weight. Another side effect of a wet mix is leaching. This is when moisture from the mortar leaches through the slabs, carrying impurities with it and leaving white staining and residue on the paving surface. You need to be particularly aware of leaching when laying some of the softer varieties of sawn sandstone. We always ensure that the Indian sandstone paving that we supply has a good density, which is much less prone to this happening.
Spot or full bed mortar?
When laying sandstone paving, or any type of paving, it should always go down on a full bed of mortar. Remember, a professionally installed natural stone patio should last until you decide that you want to replace it.
A common misconception is that paving can be laid on spots of mortar. This spot method of installing paving is a complete fail.
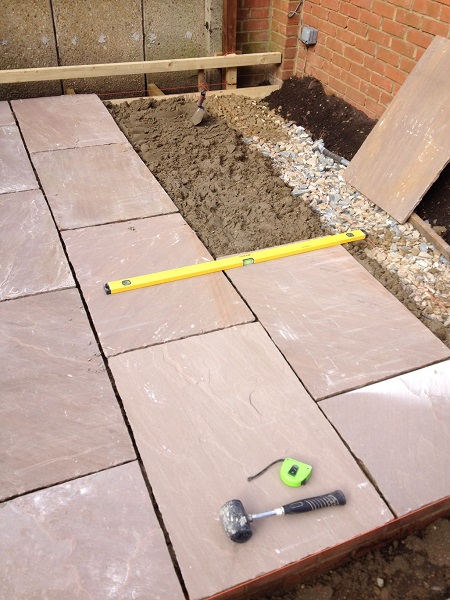
A patio installed with the spot method will last no more than a couple of years. Within six months the occasional paver will come loose and begin to rock when walked on. This movement will cause further slabs to come loose and also begin to rock. The rocking will then cause the pointing in between the slabs to come loose which will, in turn, free the slabs to move further. Within 18 months the whole patio will be rocking and all the pointing will be loose and flaking away.
Do I need a bond bridge?
One subject that keeps coming up is that of using a bond bridge when installing natural stone paving. A bond bridge is essential when using natural stone paving which has low porosity levels. Materials like slate and granite fall into this category. These types of stone are very dense and don't absorb moisture as much as other stones like sandstone.
A bond bridge is a slurry of cement and SBR (very sticky stuff) which is painted onto the back of the slabs. This then creates a bridge in between stone and bedding layer which massively aids adhesion. If you are installing granite or slate paving it is essential that a bond bridge is used.
It can also be used with sandstone paving as an extra precaution but this is not a necessity. We do, though, recommend bond bridge with sandstone pier caps and coping.
The difference between laying sawn and riven paving
Laying sawn sandstone needs greater attention to detail than riven sandstone. This is true of all sawn and riven pavings. Sawn paving has very clean edges that make it more susceptible to damage in transit or on site. The message is to be gentle with it. Once the stone has been laid and pointed then the chance of damage is much less, but until installation is complete it must be handled with care.
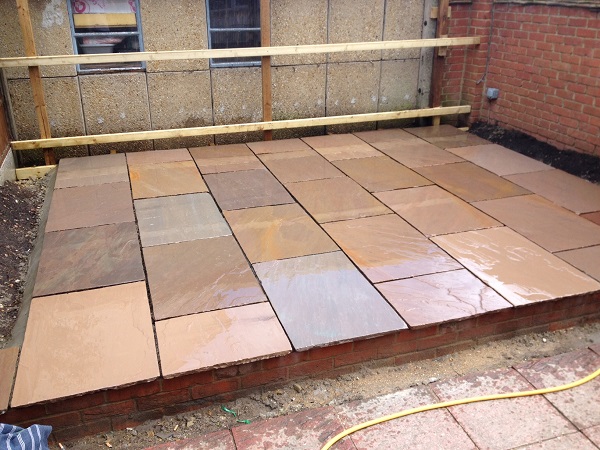
Should I butt joint sandstone paving?
Many people, especially when buying sawn garden paving, have an idea that in order to achieve a contemporary finish, the paving needs to be butt jointed. This is where stone slabs are laid flush with each other, with no jointing. It’s wrong for three reasons.
- Sawn natural stone paving always looks better with a joint of about 5mm. The joint gives the individual stones context and also helps to display the natural characteristics of the stone. Garden paving which is butt jointed looks untidy and cluttered, not exactly ideal when trying to create a modern outdoor space.
- All paving has dimensional tolerances, in the case of sawn sandstone paving the cutting tolerances are +/- 2mm. With riven stone it’s +/-5mm. These cutting tolerances make it impossible to butt joint either paving.
- Jointing is flexible, allowing the slabs to expand and contract slightly as they respond to temperature and weather conditions. Butt jointing doesn't allow this expansion and can result in damaged edges.
What pointing should I use with Indian sandstone paving?
Choosing the best pointing for your paving can be confusing but it will make a big impact on the appearance of paving. Whereas a more granular pointing looks fine with riven Indian sandstone, we wouldn’t recommend it for sawn paving, which would suit a smoother jointing compound.
Can I lay slabs on concrete?
Some landscapers prefer to do this because of local conditions. For more information on why you might want to and when it's a bad idea in laying natural stone paving on concrete.
DIY laying - how to make life easier
When laying sandstone paving, there’s plenty to learn from a professional site, and the lowliest member of it. A labourer will have to fulfil a host of tasks over the course of an average day; the list is endless.
The most important job of a labourer, though, is to keep the person you’re labouring for happy. The wheelbarrow should always be topped up with mortar, paving slabs should never be more than an arm’s length away, required tools should be anticipated, and the site should be kept clean and organised. Following this protocol makes a huge difference to how smoothly an installation proceeds.
And don’t forget the most important element of all—a regular supply of tea!
Updated February 2024