/filters:quality(75)/mediadev/media/menu-pics/menu_banner_mobile.png)
/filters:quality(75)/mediadev/media/menu-pics/all-porcelain.jpg)
/filters:quality(75)/mediadev/media/menu-pics/luxury-italian.jpg)
/filters:quality(75)/mediadev/media/menu-pics/premium-italian.jpg)
/filters:quality(75)/mediadev/media/menu-pics/budget-porcelain.jpg)
/filters:quality(75)/mediadev/media/menu-pics/large-format-porcelain.jpg)
/filters:quality(75)/mediadev/media/menu-pics/wood-effect-porcelain.jpg)
/filters:quality(75)/mediadev/media/menu-pics/porcelain-planks.jpg)
/filters:quality(75)/mediadev/media/menu-pics/porcelain-setts.jpg)
/filters:quality(75)/mediadev/media/menu-pics/browse-all-paving.jpg)
/filters:quality(75)/mediadev/media/menu-pics/driveway-paving.jpg)
/filters:quality(75)/mediadev/media/menu-pics/interior-tiles.jpg)
/filters:quality(75)/mediadev/media/menu-pics/stone-effect-porcelain.png)
/filters:quality(75)/mediadev/media/menu-pics/wood-effect-porcelain.png)
/filters:quality(75)/mediadev/media/menu-pics/grey-porcelain.png)
/filters:quality(75)/mediadev/media/menu-pics/beige-porcelain.png)
/filters:quality(75)/mediadev/media/menu-pics/dark-porcelain.png)
/filters:quality(75)/mediadev/media/menu-pics/light-porcelain.png)
/filters:quality(75)/mediadev/media/menu-pics/patio-grout.jpg)
/filters:quality(75)/mediadev/media/menu-pics/primers.jpg)
/filters:quality(75)/mediadev/media/menu-pics/porcelain-blades.jpg)
/filters:quality(75)/mediadev/media/menu-pics/pedestals.jpg)
/filters:quality(90)/mediadev/media/menu-pics/drainage.jpg)
/filters:quality(90)/mediadev/media/menu-pics/cleaners.jpg)
/filters:quality(75)/mediadev/media/menu-pics/all-stone-paving.jpg)
/filters:quality(75)/mediadev/media/menu-pics/all-sawn-paving.jpg)
/filters:quality(75)/mediadev/media/menu-pics/all-riven-paving.jpg)
/filters:quality(75)/mediadev/media/menu-pics/indian-sandstone.jpg)
/filters:quality(75)/mediadev/media/menu-pics/limestone-paving.jpg)
/filters:quality(75)/mediadev/media/menu-pics/granite-paving.jpg)
/filters:quality(75)/mediadev/media/menu-pics/slate-paving.jpg)
/filters:quality(75)/mediadev/media/menu-pics/yorkstone-paving.jpg)
/filters:quality(75)/mediadev/media/menu-pics/portland.jpg)
/filters:quality(75)/mediadev/media/menu-pics/stone-pavers.jpg)
/filters:quality(75)/mediadev/media/menu-pics/cobbles-setts.jpg)
/filters:quality(75)/mediadev/media/menu-pics/plank-paving.jpg)
/filters:quality(75)/mediadev/media/menu-pics/paving-circles.jpg)
/filters:quality(75)/mediadev/media/menu-pics/bespoke-paving-1.jpg)
/filters:quality(75)/mediadev/media/menu-pics/edging-stones-1.jpg)
/filters:quality(75)/mediadev/media/menu-pics/prestige-stone.jpg)
/filters:quality(75)/mediadev/media/menu-pics/grey-blue-stone.png)
/filters:quality(75)/mediadev/media/menu-pics/swatch-black-dark.jpg)
/filters:quality(75)/mediadev/media/menu-pics/swatch-buff-beige-white.jpg)
/filters:quality(90)/mediadev/media/menu-pics/sealants.jpg)
/filters:quality(75)/mediadev/media/menu-pics/all-clay-paving.jpg)
/filters:quality(75)/mediadev/media/menu-pics/alpha-clay-pavers.jpg)
/filters:quality(75)/mediadev/media/menu-pics/cottage-garden-clay-pavers.jpg)
/filters:quality(75)/mediadev/media/menu-pics/kessel-garden-clay-pavers.jpg)
/filters:quality(75)/mediadev/media/menu-pics/artisan-clay-pavers.jpg)
/filters:quality(75)/mediadev/media/menu-pics/grey-blue-clay-paver.png)
/filters:quality(75)/mediadev/media/menu-pics/red-brown-clay-pavers.png)
/filters:quality(75)/mediadev/media/menu-pics/beige-buff-clay-pavers.png)
/filters:quality(75)/mediadev/media/menu-pics/composite-decking.jpg)
/filters:quality(75)/mediadev/media/menu-pics/designboard-decking.jpg)
/filters:quality(75)/mediadev/media/menu-pics/classic-designboard.jpg)
/filters:quality(75)/mediadev/media/menu-pics/brushed-designboard.jpg)
/filters:quality(75)/mediadev/media/menu-pics/grooved-designboard.jpg)
/filters:quality(75)/mediadev/media/menu-pics/millboard-decking.jpg)
/filters:quality(75)/mediadev/media/menu-pics/grey-decking.jpg)
/filters:quality(75)/mediadev/media/menu-pics/black-charcoal-decking.jpg)
/filters:quality(75)/mediadev/media/menu-pics/brown-decking.jpg)
/filters:quality(75)/mediadev/media/menu-pics/all-build-deck.png)
/filters:quality(75)/mediadev/media/menu-pics/all-vertical.jpg)
/filters:quality(75)/mediadev/media/menu-pics/luxury-designclad.jpg)
/filters:quality(75)/mediadev/media/menu-pics/stone-cladding.jpg)
/filters:quality(75)/mediadev/media/menu-pics/all-garden-walling-1.jpg)
/filters:quality(75)/mediadev/media/menu-pics/facing-bricks.jpg)
/filters:quality(75)/mediadev/media/menu-pics/garden-screening.jpg)
/filters:quality(75)/mediadev/media/menu-pics/menu_Garden_banner_desk.png)
/filters:quality(75)/mediadev/media/menu-pics/all-steps-coping.jpg)
/filters:quality(75)/mediadev/media/menu-pics/stone-garden-steps.jpg)
/filters:quality(75)/mediadev/media/menu-pics/sawn-steps.jpg)
/filters:quality(75)/mediadev/media/menu-pics/riven-steps.jpg)
/filters:quality(75)/mediadev/media/menu-pics/yorkstone-steps.jpg)
/filters:quality(75)/mediadev/media/menu-pics/bespoke-steps.jpg)
/filters:quality(75)/mediadev/media/menu-pics/porcelain-steps.jpg)
/filters:quality(75)/mediadev/media/menu-pics/off-the-shelf.jpg)
/filters:quality(75)/mediadev/media/menu-pics/stone-coping.jpg)
/filters:quality(75)/mediadev/media/menu-pics/sawn-coping.jpg)
/filters:quality(75)/mediadev/media/menu-pics/riven-coping.jpg)
/filters:quality(75)/mediadev/media/menu-pics/yorkstone-coping.jpg)
/filters:quality(75)/mediadev/media/menu-pics/bespoke-coping.jpg)
/filters:quality(75)/mediadev/media/menu-pics/stone-pier-caps.jpg)
/filters:quality(75)/mediadev/media/menu-pics/porcelain-coping.jpg)
/filters:quality(75)/mediadev/media/menu-pics/all-bespoke-services.jpg)
/filters:quality(75)/mediadev/media/menu-pics/bespoke-paving-2.jpg)
/filters:quality(75)/mediadev/media/menu-pics/bespoke-steps-1.jpg)
/filters:quality(75)/mediadev/media/menu-pics/bespoke-coping-1.jpg)
/filters:quality(75)/mediadev/media/menu-pics/edge-profiles.jpg)
/filters:quality(75)/mediadev/media/menu-pics/masonry-services.jpg)
/filters:quality(75)/mediadev/media/menu-pics/deluxe-pergolas.jpg)
/filters:quality(75)/mediadev/media/menu-pics/proteus-pergolas.jpg)
/filters:quality(75)/mediadev/media/menu-pics/corten_planter_menu.png)
 Trade Discount Available
 FREE Nationwide Delivery
 Nationwide Showrooms
 Live Stock Levels
 Split Packs Available
In 2012, London Stone went “behind the scenes” with the Original Stone Paving Company and followed this large granite paving installation from start to finish.

This isn’t a step-by-step “how to lay granite paving” feature, but tells what you can expect from professional paving installation. By the end, you'll understand how experts lay high-quality paving that lasts.
Meeting the Client’s Brief
- The place: Warrington, Cheshire
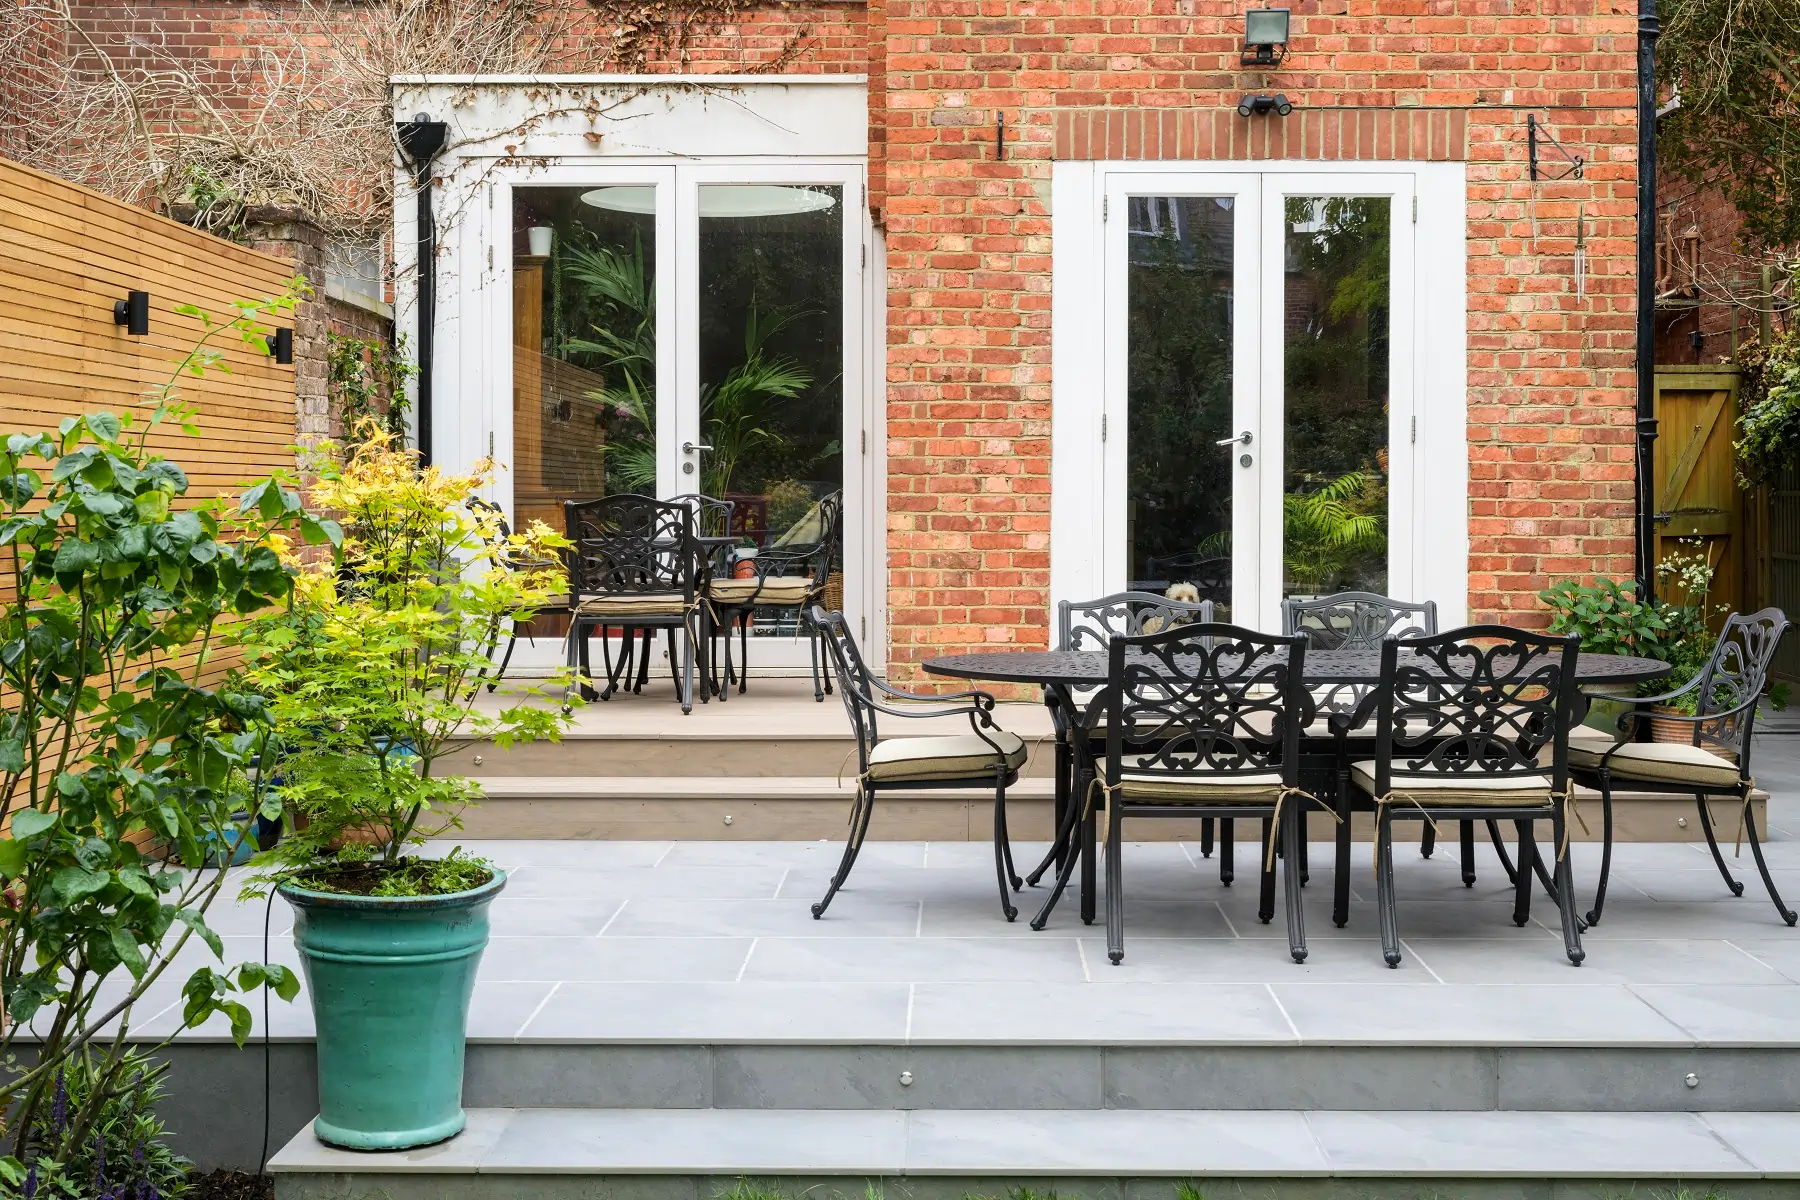
- The brief: to create a contemporary, high-quality driveway and patio that would match the ultra-modern house and retain their good looks.
A successful build is one that gives the client exactly what they want. Here, the quality expected by the client meant that concrete block paving - which is often used for driveways - was out of the question. Stephen “Cookie” Cook, owner of The Original Stone Paving Co, opted for flame-textured, six-sided sawn Silver Grey Granite with Black Basalt as edging. The tegular paving would be laid in a coursed pattern. Overall, paving would cover over 200 square metres.
Choice of Paving
The setts were all a fixed width of 150mm, and had varying lengths of 150mm, 200mm and 250mm and came from China. The majority of granite used in the UK comes from China because it’s cheaper than UK-quarried stone. This has no reflection on quality—Chinese granite is renowned for its durability.
What is a coursed pattern?
A coursed pattern is where the paving is laid in lines.
What is tegular paving?
Tegular paving is block paving of varying lengths but the same width
The sharp contrast between the colours creates a contemporary design complementing the house architecture. Generally when people are looking to create a contemporary outside space, they will opt for porcelain or natural stone products which are consistent in colour. Basalt Paving and Granite Paving are very consistent in both texture and colour.
Preparing the Site
Before a contractor can even think about laying natural stone paving, there is a lot of groundwork to be done. This site presented several challenges:
- Space was very confined.
- There were many changes of levels.
- There were lots of old concrete bases which need to be removed.
Good paving depends on good preparation, so it’s important to assess the site and plan one’s approach before starting.
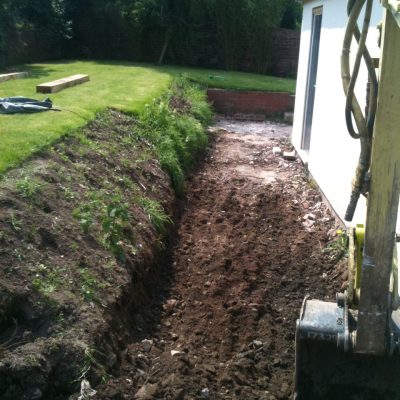
Stage 1: Excavating the site and laying groundworks
The sub base

By the second day, a mini digger had dug out the footings and Cookie’s lads had begun to install the sub base in some areas, laying MOT type 1, a graded aggregate that is then compacted with a plate compactor to form a strong base.
This is an extremely important stage, as any paving is only as good as the sub base on which it is laid.
Cookie’s team laid a graded aggregate sub base of crushed limestone to 150mm depth. They used the excavator to level off the sub base material before consolidating it with the plate compactor. It's not possible to use machines on all jobs due to space and access restrictions but on large paving installations such as this, a mini digger is essential kit.
What is graded aggregate?
Graded aggregate is made of crushed stone usually measuring 50mm down to dust. It’s the variation in the size of the sub base material which helps it to bind together and form a strong foundation.
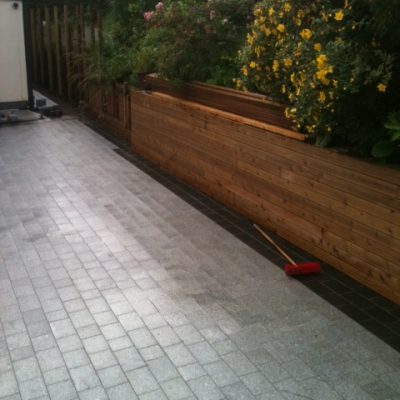
Retaining walls
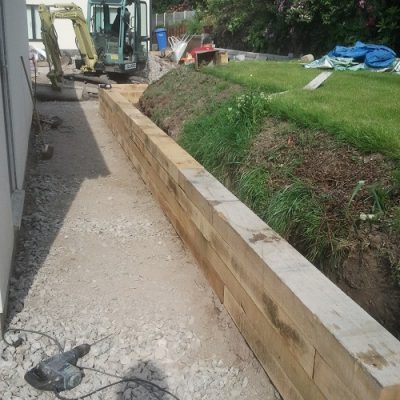
Retaining walls were also going in. Constructed of timber sleepers and solid concrete blocks, they were there to retain raised beds and higher levels and prevent them from falling in or subsiding in the future. These walls need to be very strong as they are supporting a lot of weight.
One of the good things about timber sleepers is that they can be installed very quickly and, as long as they are put in properly, they will stand the test of time. Also, being made of wood, they blend into the landscape from the start, unlike block walls which can take time to look their best.
By Day Four on site, the groundwork was almost complete. Nearly all the sub base had been laid and compacted. This is always a good stage of any paving project. It means that a lot of the dirty work has been completed.
Stage 2: Installing the edging setts
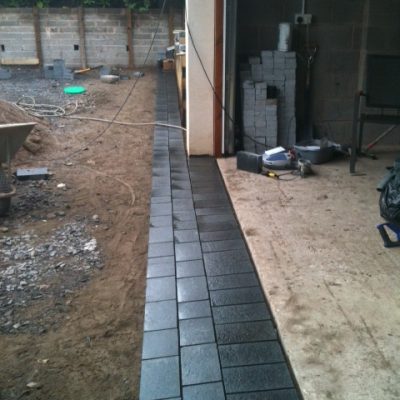
Edging should be laid first in order to create a stable frame for the main body of paving.
By Day Six, the shape and style of the garden was beginning to show. The groundworks were complete and part of the driveway and paths had been laid. Silver Grey Granite was delivered to the site, arriving on a large curtain-side lorry. Cookie had a Manitou telehandler waiting to unload the crates. It’s this sort of preparation—ensuring the necessary equipment is on site at the right time—that ensures a project goes smoothly with no time lost.
Before the Silver Grey Granite was laid, the Black Basalt edging had to go in. Like the granite, it was sawn on all six sides for a crisp, contemporary outline, and given a flame-textured finish. The contrast in colour to the main body of Silver Grey creates strong design lines and adds real definition to the edges of the paving.
Flame-Textured Finish
When hard materials like granite and basalt are sawn, the surface of the stone becomes like glass. This causes two problems. 1. The stone is very slippy. 2. It’s not very attractive. The solution is give the surface a flame-textured finish. This creates slip resistance and also improves the stone's appearance. There are many different surfaces that can be applied to sawn paving.
Stage 3: Laying the Silver Grey Granite
By Day 9, the Black Basalt edging was down and the Silver Grey Granite Setts were going down on the driveway. Where paving has to take the weight of vehicles, it needs to be strong and resistant to oil and tyre marks. The Original Stone Company have constructed driveways in natural stone paving up and down the country and almost always use granite. It’s ultra dense, which makes it very resistant to dirt and, laid professionally, will last for a very long time.
The importance of the sub base
Laying a driveway is a different process from laying a standard patio. A really solid foundation is essential. This is why it needs a very strong 150mm+ sub base of MOT type 1 that is thoroughly compacted using a compacter plate (known in the trade as a “whacker plate”).
It is also essential that the paving is laid on a full bed of mortar. This is because, where they have to bear a lot of weight, natural stone slabs are liable to crack if not fully supported from beneath. The Original Stone Paving Co used a 4:1 sharp sand to cement semi-dry mix to lay the Granite Paving.
Site organisation
Once the preparation work was complete and the edging strips set in, the paving could be laid quickly. On any type of paving project, there will be a person responsible for laying the stone. This will usually be the most skilled person on site and it is important that this person focuses solely on laying just the stone. It will be the labourer’s job to make sure that the layer has a regular supply of bedding layer and paving material close to hand.
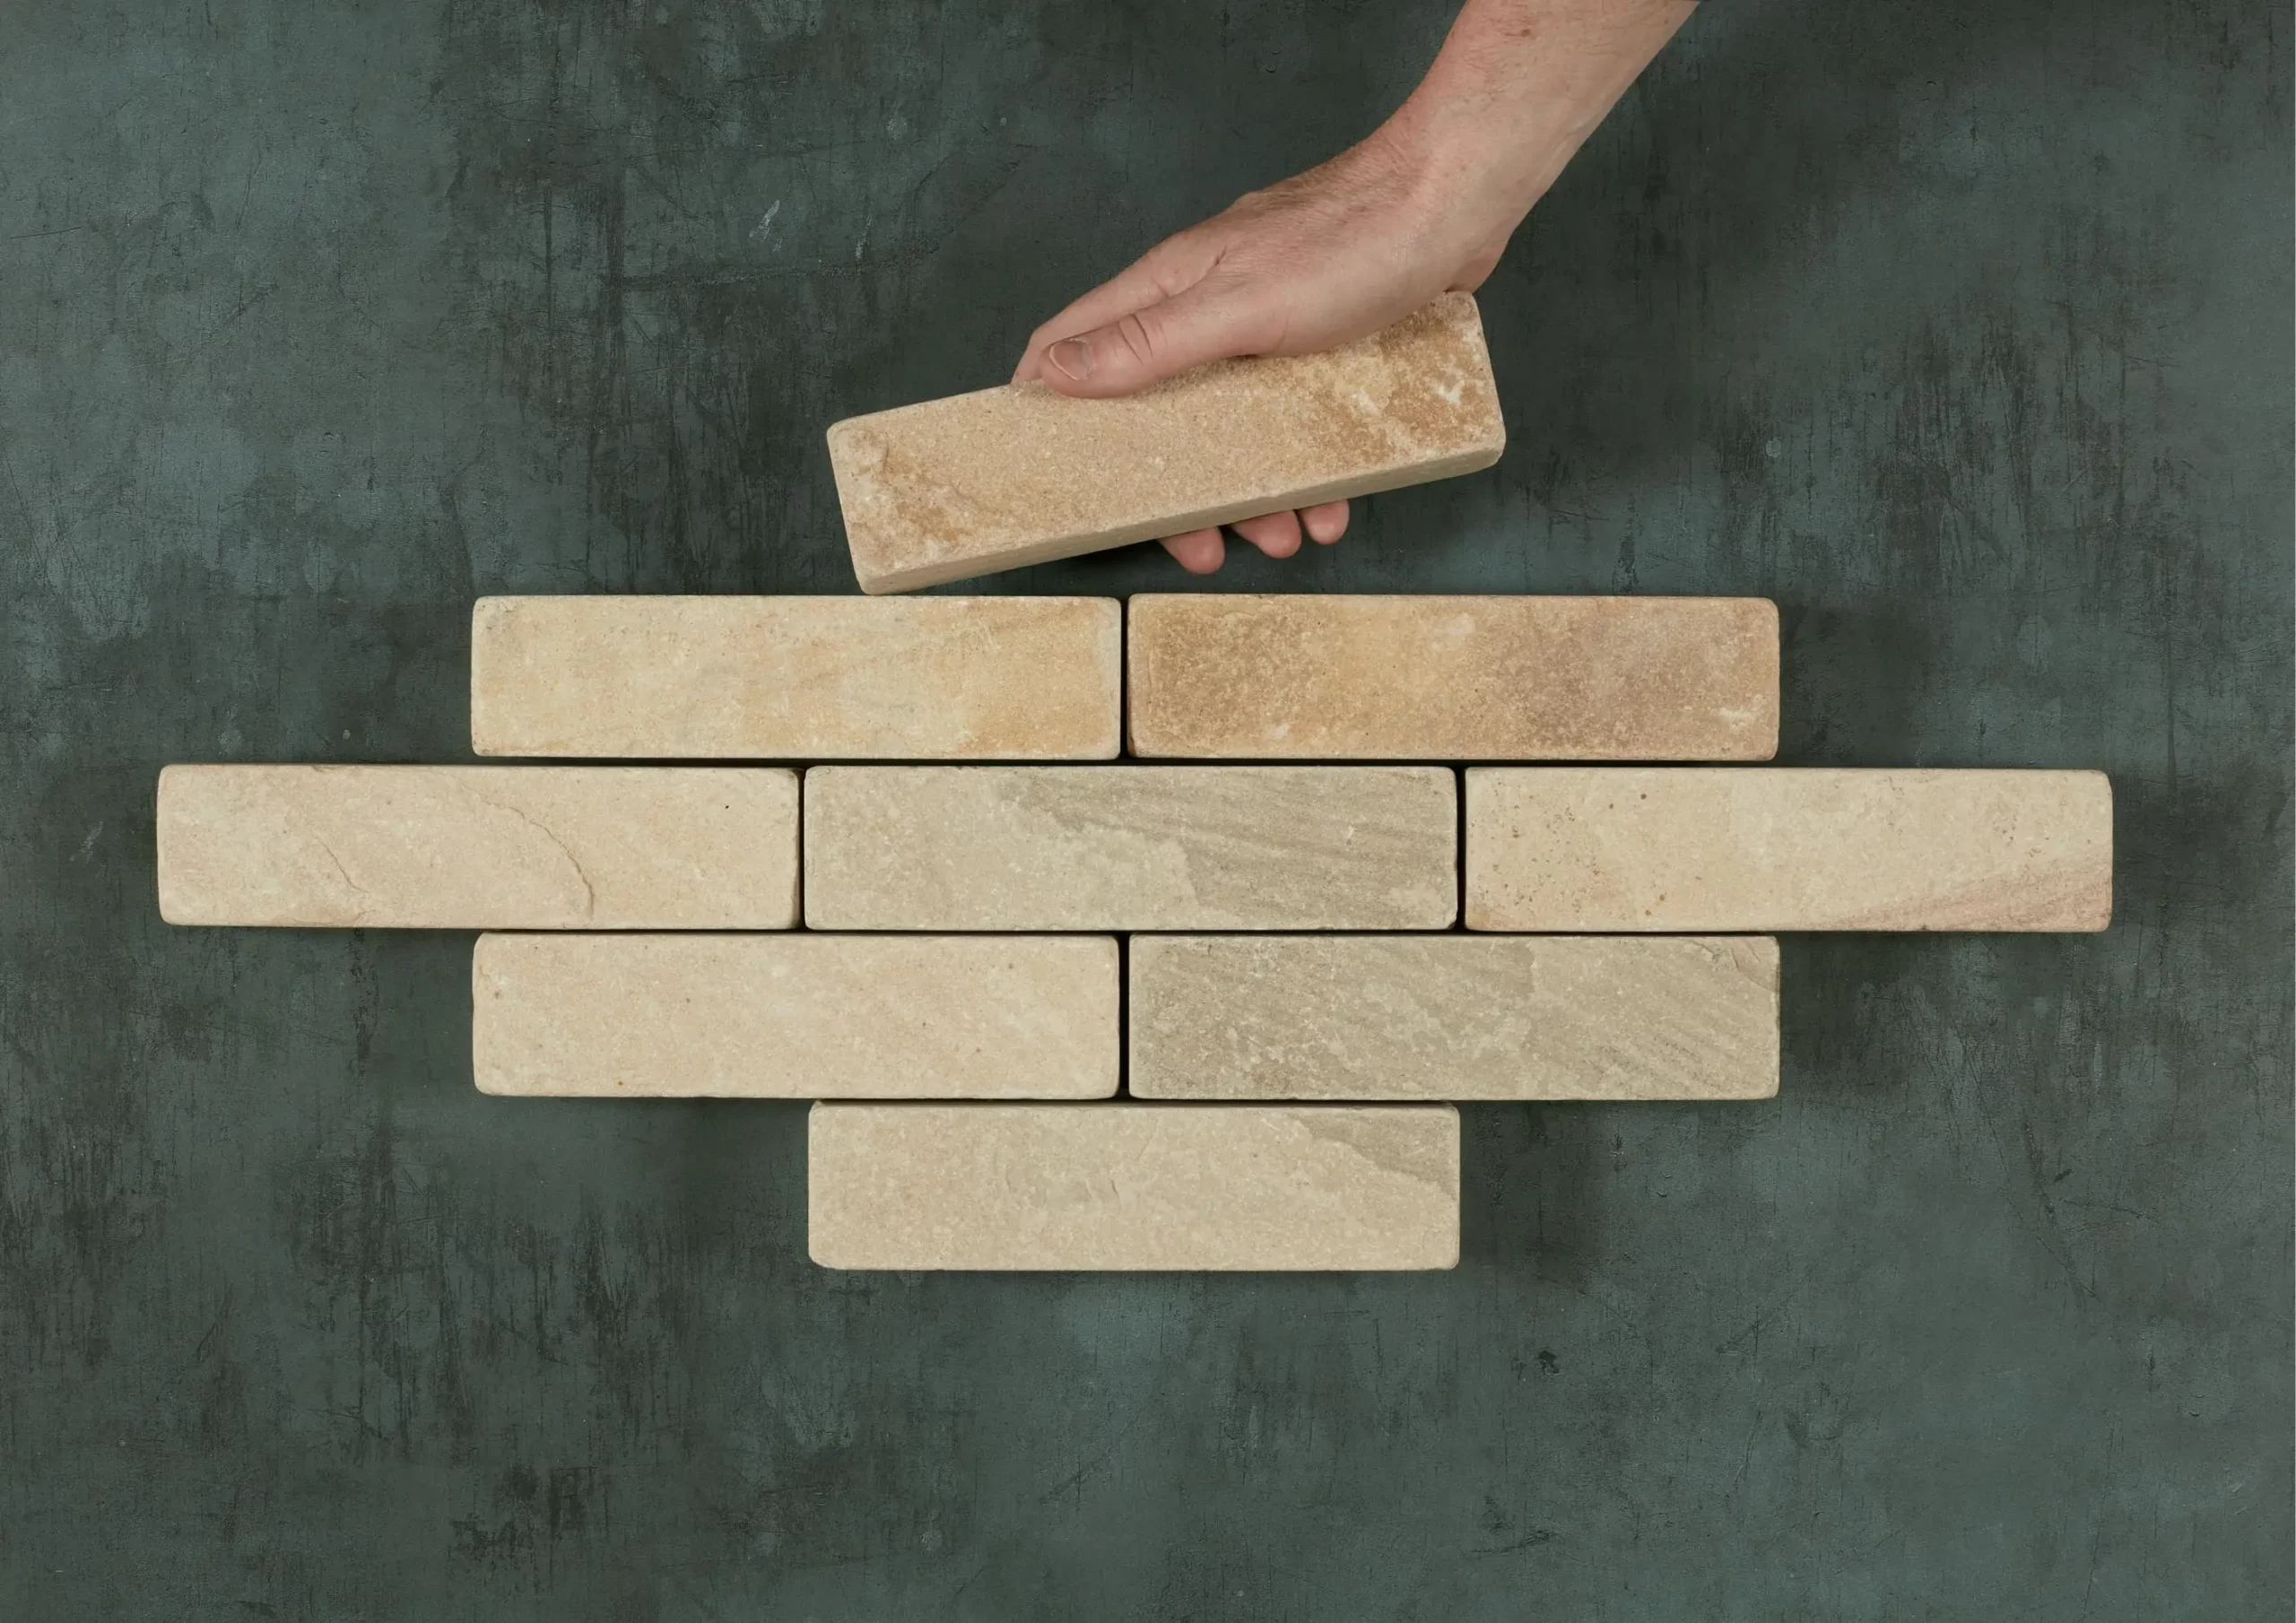
What are paving setts?
Natural stone setts—also known as cobbles—are available in limestone, Indian sandstone and granite. Finishes include sawn, riven and tumbled to suit contemporary or traditional settings. Setts make a valuable contribution to garden design, working well as a hard-wearing attractive driveway used on their own, or in small spaces such as courtyards, where their dimensions can make the area feel bigger. They are also an ideal addition to larger paving slabs, adding edging detail and introducing pattern. For a very modern look, consider porcelain setts. And for similar applications but with a completely different feel, take a look at our clay pavers.
The photo below shows all the granite setts laid out in neatly stacked piles. This means that the layer always has stone within easy reach. A common saying of skilled tradesmen in the construction industry is that "you are only as good as your labourer". This is very true and underlines the importance of having the whole team on site and not just the skilled people.
How to lay natural stone in wet weather
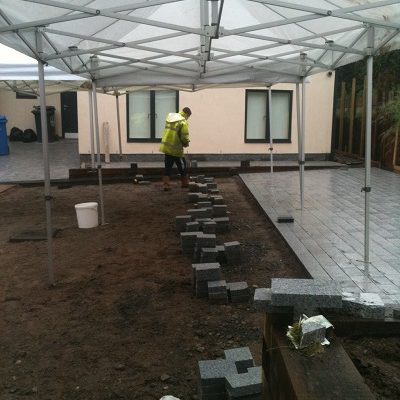
At this point in the project, the heavens opened and it poured down for several days. Rain can often bring natural stone installations to an abrupt halt, but not here. The vastly experienced Original Stone Paving Co use gazebos to protect the site from the weather. The result? They can continue to lay paving in all weather conditions, the client gets the job finished on time, and nobody has to have time off work. Gazebos are not possible on every project due to space on site, but on large installations like this they become invaluable.
The British weather is one of the biggest challenges faced by UK hard landscaping companies. It doesn’t make it easy to get the project finished on time and also achieve a high-quality finish. Many sawn paving products available in the UK need to be sealed and, if natural stone is sealed on site, dry weather is essential. Luckily granite is extremely hard and does not need to be sealed, but it is still important to have clean conditions on site to achieve the perfect finish.
Creating a professional finish
One of the most challenging aspects of any landscaping project is to finish the job to a high standard. The small details of the project are what set your project apart from the competition. Getting the detail right is often time-consuming but taking your time at the end of a project is essential if you are to achieve that perfect finish.
Getting the levels right
A slight change on site meant that it was important to bring in more MOT type 1 to ensure a smooth, even finish. A string line was used to make sure the MOT was installed at the right level.
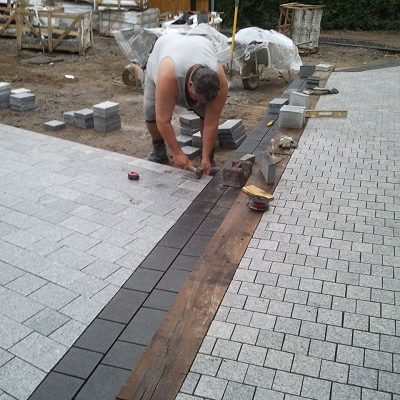
Smooth transitions
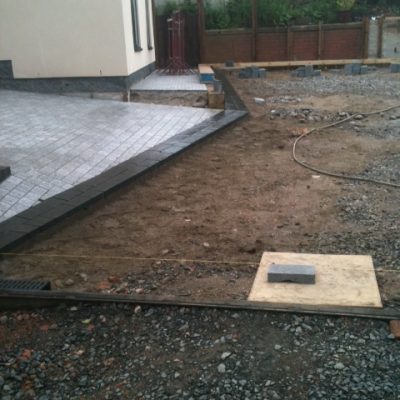
It's important to get levels right and here you can see the string line ensuring a smooth plane.
By Day 12 the main body of the 200m2 of garden paving was almost complete, and you could see the different paving sections joining together. To lay natural stone paving to a high standard takes skill and experience. It’s very important for the different sections to seamlessly connect. In the photo above we can see the Black Basalt Sawn Setts meeting Silver Grey Sawn Granite. Areas like this are highly defined and very noticeable. When done properly they look sublime. If areas like this are finished to a low standard, they stick out like a sore thumb.
When laying natural stone, or any type of paving, it is very important that it is laid on a smooth plane. This allows for easy drainage and also prevents any dips. In order to achieve a smooth plane, it is essential to use string lines as a guide. You should then use a spirit level as you go and constantly check the level of the finished patio height against the string lines. When you are laying Indian sandstone paving or other types of riven stone, it can be quite tricky to get the paving on a smooth plane but with sawn paving it is a little easier, as long as you know what you are doing.
Cutting crisp edges
By the end of two weeks, the bulk of the granite was installed and Cookie and his team started to fill the gaps. This often involves lots of cutting. Granite is one of the hardest types of stone paving, much more difficult to cut than sandstone and limestone. When cutting natural stone paving, it is essential to use a diamond-tipped blade. Even with a diamond blade it can still be difficult to cut granite, but a good quality blade will easily cut through sandstone, limestone and slate. Diamond blades are expensive but essential piece of kit.
Good pointing
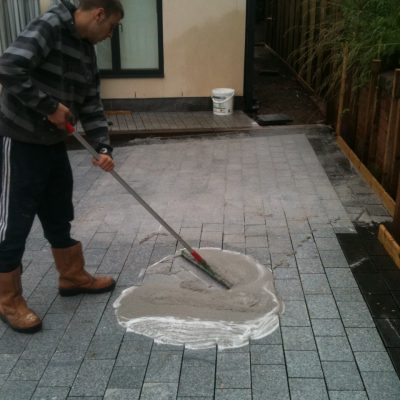
All the stone is being pointed with GftK, which is an epoxy resin which is swept into the gaps and left to go off. There are many different ways of pointing garden paving, but for large areas of stone setts, sweep-in compounds are regularly used. GftK is mixed with a hardener which goes rock hard. Sweep-in compounds are not suitable for all types of natural stone and I certainly would not recommend them for certain types of sawn sandstone, but for large areas of stone setts they are perfect.
And finally...
The Original Stone Paving Company works nationwide and specialise in the installation of Natural Stone. It’s owned by Stephen Cook (known as Cookie) who has decades of experience. With a reputation for quality workmanship, the company has worked on numerous high-profile buildings, including The Houses of Parliament, Clarence House and on Edinburgh's Royal Mile.
The “Groundforce effect”, as it became known in the landscaping industry, was the impression given by the 1990s TV programme that garden transformations can be done overnight. Reality TV shows still give this impression. Laying high-quality paving that lasts is a skilled job that takes time to get right.
If you’re thinking of getting your garden done, why not visit our Connect pages to find garden designers and landscaping professionals in your area?
Updated: September 2022